A solar site plan is the layout page in your quote or permit packet that shows the physical arrangement of the project on your property. In plain English, it is the “where everything goes” drawing.
For a rooftop residential system, the site plan usually shows where the solar panels will sit on the roof, where the inverter and disconnects are located, where the utility meter and service equipment are, and how major equipment relates to the house, garage, or other structures.
For homeowners, this page matters because it can reveal design compromises, equipment placement you may not like, hidden electrical scope, and details that can affect permitting, inspection, and change orders.
Source: SolSmart simplified permitting guidance says permit packages commonly include a site plan showing the location of major components, and that it represents the relative location of components at the site.
Quick answer: what a solar site plan is
A solar site plan is the layout drawing that shows the physical location of the solar array and major equipment on your property. It is different from the electrical one-line diagram. The site plan answers “Where will it go?” while the one-line answers “How does it connect?”
Site plan vs one-line diagram vs spec sheet
Site plan = physical layout
This page shows the roof or property layout, panel placement, equipment locations, access/setback notes, and often conduit or equipment-routing notes.
One-line = electrical map
The one-line diagram is the simplified electrical drawing that shows the main components and how power flows between them.
Spec sheets = equipment details
Spec sheets are the manufacturer cut sheets for the modules, inverter, battery, racking, and other listed equipment.
A helpful shortcut is this:
- Site plan = location
- One-line = connection
- Spec sheets = equipment details
Source: PV plan-set references describe the site plan as the layout showing array placement and equipment locations, while the single-line shows the simplified electrical map.
What you will usually see on a residential solar site plan
1) Roof planes and panel layout
Most site plans show the roof shape and where the modules will be installed. You may see panel rectangles laid out in rows, roof section labels, total module count, and notes about roof pitch, azimuth, or obstructions like vents, skylights, chimneys, and ridges.
This is where you check whether the panel count matches the quote and whether the layout is using the roof faces you expected.
2) Setbacks and access pathways
Many site plans include notes or dimensions for required clearances from ridges, hips, valleys, edges, or firefighter access pathways. The exact rule is not identical everywhere because local code adoption and fire-review practices can vary, but these notes are common and important.
If your panel count looks lower than expected, setbacks and access pathways are one of the most common reasons.
Source: Permit-guideline references call for a roof layout that marks panel locations and roof fire-access setbacks on roof-mounted systems. Structural commentary also notes that setback distance can be greater where fire-access pathways are required.
3) Inverter, battery, disconnect, and meter locations
A good site plan often shows the location of the inverter, battery system if included, AC disconnect, utility meter, main service equipment, and sometimes rapid-shutdown-related labeling or equipment locations.
This matters because equipment placement affects appearance, service access, and sometimes whether conduit will be visible.
4) Main panel and service-equipment references
The site plan may show the main panel, meter-main combo, subpanel, or other service-equipment references. That helps you visualize where any added panel work, disconnect hardware, or interconnection-related scope will physically happen.
5) Conduit routes and notes
Some site plans or layout pages show approximate conduit routing. Others note attic runs, exterior conduit, and transition points. Homeowners often overlook this until after install, but it can be one of the biggest visual surprises on the home.
How to read a solar site plan step by step
Step 1: Confirm the basic project scope
Start with the basics:
- number of panels
- roof location
- major equipment shown
- battery included or not
- any added disconnects or panel work
Compare the site plan against the sales proposal. If the quote promised one thing but the design shows something else, ask why before permitting moves forward.
Step 2: Check roof placement and design logic
Look at which roof planes are used and whether the layout matches your expectations.
Common reasons a layout differs from what you imagined include setback requirements, shade avoidance, roof obstructions, structural limits, aesthetics, and the installer optimizing for annual production rather than using only one roof face.
Related reading:
- https://solarbasicshub.com/string-inverter-vs-microinverter/
- https://solarbasicshub.com/power-optimizer-vs-microinverter/
Step 3: Check equipment placement
Find the inverter, battery, disconnects, and meter. Then ask:
- Is any equipment in a place I dislike visually?
- Is outdoor equipment being mounted somewhere I should discuss?
- Is service access reasonable?
- Is the battery really shown, or only mentioned in sales talk?
Step 4: Check the service-equipment side of the house
If the project includes main panel changes, an AC disconnect, or utility-facing hardware, the site plan should show where that physical scope lives.
This is where many change orders begin. A homeowner hears “standard install,” but the plan later shows panel upgrades, exterior disconnects, meter-main changes, longer conduit paths, or other added work.
Related reading:
- https://solarbasicshub.com/main-panel-upgrade-for-solar/
- https://solarbasicshub.com/solar-ac-disconnect-explained/
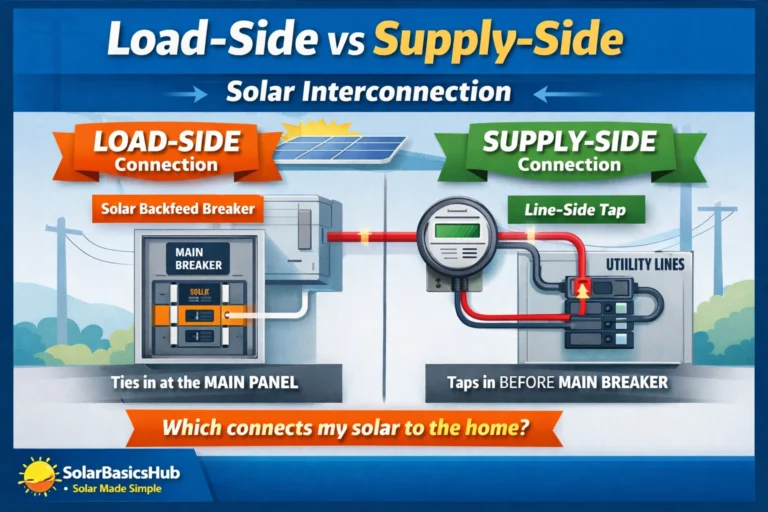
- https://solarbasicshub.com/load-side-vs-supply-side-solar-interconnection/
Step 5: Match the site plan against the one-line diagram
The site plan and the one-line diagram should tell the same story.
- If the site plan shows a battery, the one-line should show battery-related electrical equipment.
- If the one-line shows an AC disconnect, the site plan should show where it goes.
- If the one-line shows service-equipment complexity, the site plan should help you visualize the physical location.
Related reading:
What the site plan can reveal about your project
Hidden electrical scope
A site plan can reveal whether your “solar install” is really a bigger electrical project. It may expose added disconnect hardware, panel work, meter-main modifications, subpanel work, or visible conduit runs that were not obvious from the sales summary.
Roof limitations and design compromises
The layout may reveal that your ideal panel count does not fit cleanly once setbacks, obstructions, and access requirements are applied.
Whether backup equipment is really included
If the proposal mentions backup or battery readiness, the site plan can help separate “future possibility” from “present scope.” A real backup-capable project usually shows clear physical equipment associated with backup design.
Whether aesthetics may become a problem
Some homeowners care more about visible conduit, inverter placement, or front-of-house hardware than they realize at first. The site plan gives you a chance to discuss those tradeoffs before install day.
Common red flags homeowners should not ignore
- The panel count on the plan does not match the quoted system.
- A battery was sold verbally, but no battery location appears on the design documents.
- A new disconnect or panel change appears on the design but not clearly in the quoted scope.
- The layout uses a different roof plane than expected and no one explained why.
- The plan is too vague to tell where major equipment will go.
- The site plan and one-line seem to disagree.
- The installer cannot explain setback or access choices in plain English.
- The conduit path or wall-mounted equipment placement would obviously bother you, but no one has discussed options.
Copy/paste questions to ask your installer
- Can you walk me through the site plan in plain English and confirm the final panel count?
- Which roof faces are being used, and why did you choose those locations?
- What setback or access-path rules are affecting the layout in my project?
- Where exactly will the inverter, disconnects, and any battery equipment be mounted?
- Will any conduit be visible on the roof or exterior walls? If yes, where?
- Does this design include any main-panel upgrade, exterior disconnect, meter-main change, or other electrical adder?
- Can you show me how the site plan matches the one-line diagram?
- If I want to change equipment placement for aesthetics, what is still possible before permit submission?
- Are all items shown on the plan included in the quoted price?
- If the AHJ or utility requires a revision, how will that affect timeline and cost?
Simple table: what each site-plan item tells you
| Item on the site plan | What it usually tells you | Why homeowners should care |
|---|---|---|
| Panel layout | Where modules will be placed | Confirms count, roof face, and aesthetics |
| Setbacks / access paths | Required clearances around the array | Can reduce panel count or shift layout |
| Inverter location | Where power-conversion equipment sits | Affects appearance and service access |
| Battery location | Whether storage is really included | Confirms backup scope is real, not just sales language |
| AC disconnect / service equipment | Extra electrical hardware location | May reveal hidden scope or added cost |
| Meter / utility side | Where solar ties into service | Helps explain interconnection complexity |
| Conduit route | How wiring may run physically | Important for appearance and change-order prevention |
FAQ
1) What is a solar site plan in simple terms?
It is the layout drawing that shows where the panels and major equipment will physically go on your property.
2) Is a solar site plan the same as a one-line diagram?
No. The site plan shows physical placement. The one-line shows the electrical connection path.
3) Does every residential solar project have the exact same site-plan requirements?
No. Permit and design requirements can vary by AHJ, utility, roof type, and project scope. That is why you should ask what rules are driving your specific layout.
4) Why does my layout leave empty roof space?
Common reasons include setbacks, roof obstructions, shade, structural considerations, or design choices tied to electrical architecture.
5) Should I worry if the site plan changes after review?
Not automatically. Some revisions happen during permit review or utility feedback. But you should ask whether the revision changes price, timeline, panel count, or equipment location.
6) What is the smartest way to review a site plan before signing?
Compare the layout page, the one-line diagram, and the quoted scope together. Make the installer explain all equipment placement and all electrical adders in writing.
USA-safe note
This guide is for homeowner education and quote review only. It does not provide wiring, rooftop work, or permit-submittal instructions for DIY installation. Any work involving roofing, electrical equipment, service conductors, disconnects, batteries, or panel modifications should be handled by qualified professionals and approved by the local AHJ and utility where required.
Source: U.S. DOE homeowner guidance says installers and utilities provide the exact steps needed for home solar projects, while NREL/SolSmart permitting resources show residential PV permitting involves building, electrical, and fire review.
Next to Read
- https://solarbasicshub.com/solar-one-line-diagram-explained/
- https://solarbasicshub.com/solar-ac-disconnect-explained/
- https://solarbasicshub.com/load-side-vs-supply-side-solar-interconnection/
- https://solarbasicshub.com/main-panel-upgrade-for-solar/
- https://solarbasicshub.com/solar-permits-inspection-interconnection-pto/
- https://solarbasicshub.com/how-to-compare-solar-quotes-line-by-line/
- https://solarbasicshub.com/string-inverter-vs-microinverter/
- https://solarbasicshub.com/power-optimizer-vs-microinverter/