Who this is for
This guide is for beginners who want to understand what parts make up a solar system and how to do safe, high-level sizing for planning and quote comparison—without wiring instructions or unsafe DIY steps.
If you haven’t read it yet, start with Pillar 01: Solar Basics: How Solar Power Works
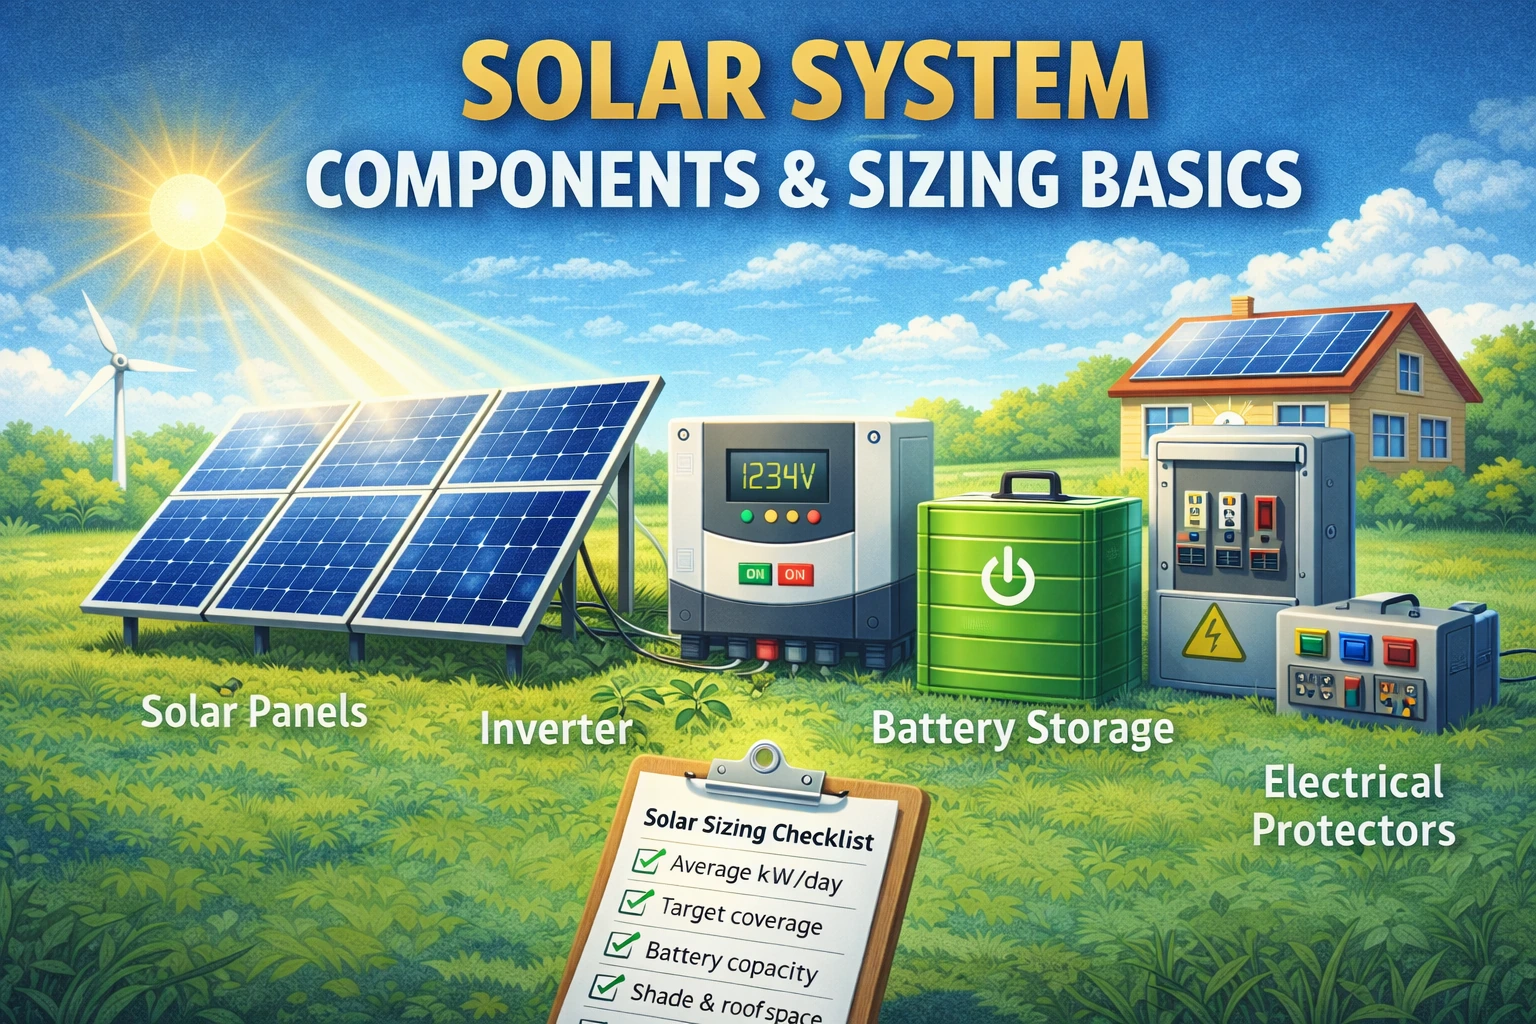
The 6 major building blocks of a solar system
A complete solar system is more than panels. Here are the big pieces you’ll see in most quotes:
1) Solar panels (PV modules)
Panels convert sunlight into DC electricity. Panel quality, efficiency, and warranty matter, but layout and shading often matter even more.
2) Inverter (DC → AC conversion)
The inverter converts panel DC electricity into AC your home can use. The inverter is also a “brain” for monitoring, safety shutdown, and (in some systems) battery charging.
Related: Inverters (types, what they’re for, what to compare)
3) Mounting / racking (roof or ground)
Hardware holds panels securely and affects long-term reliability (wind resistance, corrosion resistance, roof penetrations, drainage).
4) Electrical protection + wiring (Balance of System)
Often called BOS (balance of system). This can include disconnects, breakers, wiring, grounding, surge protection, combiner boxes, and safety devices depending on the design.
5) Monitoring (highly recommended)
Monitoring lets you confirm production and spot issues early. Some monitoring is built into the inverter; some is app-based with extra hardware.
6) Optional energy storage (battery) and charging equipment
Batteries store energy (kWh). Some systems also include charge controllers or battery management features, especially off-grid designs.
Inverter types: what you’re really choosing
Your inverter choice affects performance in shade, monitoring detail, cost, and serviceability.
String inverter
- One central inverter (or a few)
- Panels connect in “strings”
- Often cost-effective and common in straightforward roofs
Good for: simple roofs, minimal shading, strong budget focus.
Microinverters
- One small inverter per panel
- Panel-level conversion and monitoring
- Can perform well with partial shading or complex roofs
Good for: roofs with shading, multiple orientations, or where panel-level visibility is valuable.
Hybrid inverter
- Designed to work with batteries and the grid
- Can enable backup features when paired with storage and proper configuration
Good for: backup goals, time-of-use optimization, higher self-consumption.
Tip: Don’t choose by “brand popularity” alone—choose by roof shape + shading + goals + service support.
Battery basics: energy (kWh) vs power (kW)
People often mix up two battery specs:
- kWh (energy): how long the battery can run loads
- kW (power): how much the battery can deliver at one moment
A battery can have plenty of kWh but limited kW (meaning it lasts long for small loads, but can’t start big loads). For backup, both matter.
Sizing solar safely: a planning method you can do from your utility bill
You do not need engineering software to create a planning estimate. You need three things:
- your electricity use (kWh)
- a coverage goal (%)
- a realistic production assumption (sun + losses)
Step 1: Find your monthly kWh (from the bill)
Look for kWh used per month. If you have 12 months, take a simple average and also note your highest/lowest months (seasonality).
Daily average (kWh/day) = monthly kWh ÷ 30
Example: 900 kWh/month → about 30 kWh/day.
Step 2: Pick a realistic coverage target
Coverage means “what share of your annual use you want solar to supply.”
Common planning targets:
- 50–80% for many grid-tied savings setups
- Critical loads for backup (not the whole home)
- Near 100% only when you understand the tradeoffs (seasonality, export limits, batteries)
Pick one target so your quote process stays focused.
Step 3: Estimate daily solar production (planning-level)
A simple planning relationship:
Daily solar energy (kWh) ≈ system size (kW) × peak sun hours × performance factor
Where the performance factor accounts for heat, inverter losses, wiring, dust, and other real-world losses.
Because peak sun hours vary by location and season, your “best estimate” should be confirmed with a quote or a solar production tool. The goal here is a reasonable starting number.
A simple sizing worksheet (copy/paste)
Fill this in and you can compare quotes much more effectively:
A) Usage
- Average monthly kWh: ______
- Average daily kWh/day: ______
- Highest month kWh (optional): ______
- Lowest month kWh (optional): ______
B) Goal
- Target solar coverage (%): ______
- Primary goal: Savings / Backup / Independence / Mix
C) Site notes
- Roof type: flat / pitched / mixed
- Shading: none / mild / moderate / heavy
- Roof orientations (if known): ______
- Available panel space estimate: ______
D) Preferences
- Inverter preference: string / micro / hybrid / not sure
- Battery interest: yes / no / maybe
- Monitoring: basic / detailed panel-level
Inverter sizing (conceptual, safe guidance)
Inverter sizing depends on:
- PV array size (kW)
- Site conditions (heat can affect output)
- System design choices
- Whether you want backup and what loads you want to support
Practical way to think about it
- Grid-tied (no backup): inverter is mainly about converting solar to AC efficiently and reliably.
- Hybrid/off-grid: inverter must also support backup operation and sometimes high start-up surges (motors, pumps).
Safe takeaway: If backup is important, discuss “surge capability” and “critical loads” with the installer rather than guessing.
Battery sizing for backup: start with critical loads
Most homes don’t need “whole-home backup” to get real resilience. Start with the essentials.
Step 1: Make a critical-loads list
Common critical loads:
- Refrigerator
- Lights in key rooms
- Wi-Fi/router
- Phone charging
- A few outlets for small devices
Optional (depending on system): small fan, TV, laptop, security system.
Step 2: Decide the backup duration you want
Examples:
- 4 hours (short outages)
- 8–12 hours (overnight resilience)
- 24 hours (rare, more expensive)
Step 3: Planning estimate (no wiring math)
Battery energy (kWh) ≈ average critical-load power (kW) × hours
Add buffer for real-world behavior and battery usable capacity. Your installer can translate your list into a more accurate design.
Charge controllers: when they appear and what they do
Charge controllers are common in many off-grid architectures and some battery-based systems. They regulate how panels charge batteries, protecting battery health and improving efficiency.
Two common types:
- PWM: simpler, usually lower cost
- MPPT: often more efficient, especially when panel voltage is higher than battery voltage
Many modern hybrid systems integrate charging functions, so a separate controller may or may not be used depending on design.
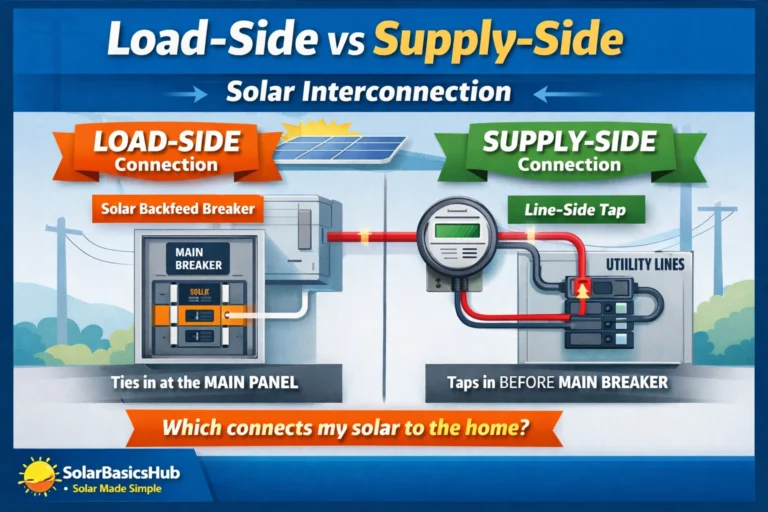
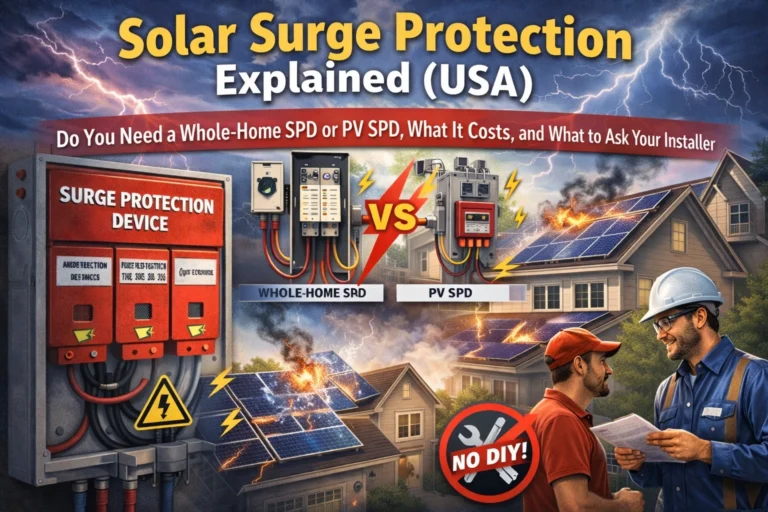
The “hidden” components that affect reliability (Balance of System)
BOS is where many long-term reliability wins or losses happen. Ask about:
- Surge protection (especially in lightning-prone areas)
- Proper grounding approach (per local code)
- DC/AC disconnects and safety shutdown
- Cable quality and UV resistance (for outdoor runs)
- Roof waterproofing details (for roof mounts)
- Conduit and protection from animals/heat (where relevant)
You don’t need to install these yourself—just make sure they’re included and documented.
Roof vs ground mount: a quick comparison
| Factor | Roof mount | Ground mount |
|---|---|---|
| Space use | Uses existing roof | Needs land/yard space |
| Maintenance access | Harder to access | Easier to clean/inspect |
| Tilt/orientation control | Limited by roof | Highly flexible |
| Structural concerns | Roof penetrations & load | Posts/footings & fencing |
| Aesthetics | Often cleaner look | More visible from yard |
There’s no universal best—pick what fits your property and budget.
Quote comparison checklist (use this to avoid “apples vs oranges”)
When comparing solar quotes, ask for these items in writing:
Production + assumptions
- Estimated annual kWh production
- Shading assumptions (if any)
- Performance factor used (loss assumptions)
Hardware details
- Panel model and wattage
- Inverter type and model
- Battery model (if included) + usable capacity
Warranties and support
- Panel product warranty (years)
- Panel performance warranty (years)
- Inverter warranty (years)
- Workmanship/installation warranty
- Monitoring platform included
- Local service process (who fixes it and how fast)
Financial clarity
- Total cost and payment terms
- Any incentives (if applicable) and who handles paperwork
- Expected savings assumptions (clearly stated)
- Payback estimate and what it depends on
This checklist turns quotes into comparable data.
Common beginner mistakes (and how to avoid them)
- Sizing by panel count instead of energy use
Start with kWh and goals, then size. - Ignoring when you use electricity
If usage is mostly evenings, batteries or rate plans can matter more. - Buying storage “just for savings” without validating assumptions
Batteries often shine for reliability. Validate payback carefully. - Underestimating shading
Shading is one of the biggest real-world production killers. - Skipping roof condition check
Installing on an aging roof can create costly removal/reinstall later.
Decision table: which setup fits your goal?
| Your priority | Best-fit direction | Why |
|---|---|---|
| Lowest upfront cost | Grid-tied (no battery) | Simple and cost-effective |
| Backup protection | Hybrid + battery (critical loads) | Reliable resilience |
| No grid access | Off-grid + storage strategy | Designed for independence |
| Complex/shaded roof | Microinverters or optimizers | Better panel-level performance |
| Max control over usage | Hybrid + monitoring | Helps self-consumption and insight |
Panel specs cheat sheet (what to compare, without getting lost)
Installers may list many panel specs. For a beginner, these are the most useful to compare:
- Wattage (W): how much power a panel can produce under standard test conditions (used for array size math).
- Efficiency (%): how much sunlight becomes electricity; higher efficiency can help when roof space is limited.
- Temperature behavior: panels produce less in high heat; good design accounts for this with realistic production estimates.
- Warranty coverage: look for both product (materials) and performance warranty details.
Practical tip: If you have plenty of roof/ground space, chasing the “highest efficiency” panel often matters less than good layout, shading control, and a solid installer warranty.
Estimating roof space (safe planning method)
You can do a rough space check without any technical tools:
- Identify the roof sections that get the most sun.
- Estimate “usable rectangles” that avoid vents, skylights, and setbacks.
- Note any shade sources (trees, nearby buildings) and when they cast shade.
- Take a few photos (morning and afternoon) for installers—this speeds up accurate proposals.
Panel sizes vary by model, so the installer will finalize how many fit, but your notes prevent unrealistic early quotes.
Future-proofing your system (EVs, heat pumps, lifestyle changes)
Many homes increase electricity use over time (EV charging, heat pumps, more air conditioning, home office equipment). Before finalizing size, ask:
- “What if my usage rises by 20–30% in the next few years?”
- “Can the design be expanded later?”
- “Is the inverter sized with expansion in mind, or would it need replacement?”
Sometimes it’s better to plan a system that can be expanded than to oversize immediately—especially if roof space or export limits exist.
Monitoring: the 5 signals that help you catch problems early
Good monitoring typically shows:
- Daily and monthly energy (kWh)
- Power over time (kW curve)
- Inverter status / error codes
- Grid import/export (if available)
- Battery charge/discharge (if you have storage)
Red flags worth investigating:
- A sudden drop that doesn’t match weather patterns
- One part of an array underperforming consistently
- Frequent inverter errors or offline monitoring
Monitoring doesn’t replace professional service, but it helps you notice issues early—often before they become expensive.
Turn your worksheet into “smart questions” for installers
Bring your filled worksheet and ask these:
- “What annual production (kWh) do you estimate, and what assumptions did you use?”
- “How did you account for shading and seasonal changes?”
- “Which inverter type fits my roof and why?”
- “If I add a battery later, is this system ready for it?”
- “What is included in workmanship warranty and who handles service?”
- “What is the plan if monitoring shows a persistent performance gap?”
Installers who answer clearly (and put it in writing) are usually safer long-term partners.
Quick recap: what a ‘good’ solar quote includes
A strong quote usually includes:
- System size (kW) and expected annual energy (kWh)
- Hardware models (panels, inverter, batteries if any)
- Clear warranty terms (hardware + workmanship)
- Site-specific notes (roof sections, shading considerations)
- A transparent payback/savings explanation with assumptions stated
If any of these are missing, ask—don’t guess.
When to consult a professional (important)
Solar design involves electrical safety and structural loads. Consult qualified professionals if:
- You want backup for high-surge appliances (pumps, AC, compressors)
- You’re planning off-grid systems
- Your roof structure is uncertain
- You need permits/utility interconnection
- You want changes to your main electrical panel or critical circuits
This article is for education and planning only.